

View or update schema definitions
After loading the schema successfully, one may start the ClassEditor in order to view the result or update the schema, but one may also skip this step and continue immediately with creating test data. After starting the ClassEditor the first time, you are prompted to initialize the resource project.

For first test it is suggested to use OSI interface (IFT_odabaOSI), which is the default setting, when the project has been initialized as OSI project before. We suggest using OSI interface in order to build fast prototypes. Since OSI provides a script interface, compiling and linking is not necessary. After clicking OK, ClassEditor resources will be initialized which may take up to 1 minute. After a while, the ClassEditor opens and displays project classes. The default view shows the class view, i.e. the three persistent sample classes. In order to view structure (complex data type) properties, Sample/Structures has to be expanded in the tree.
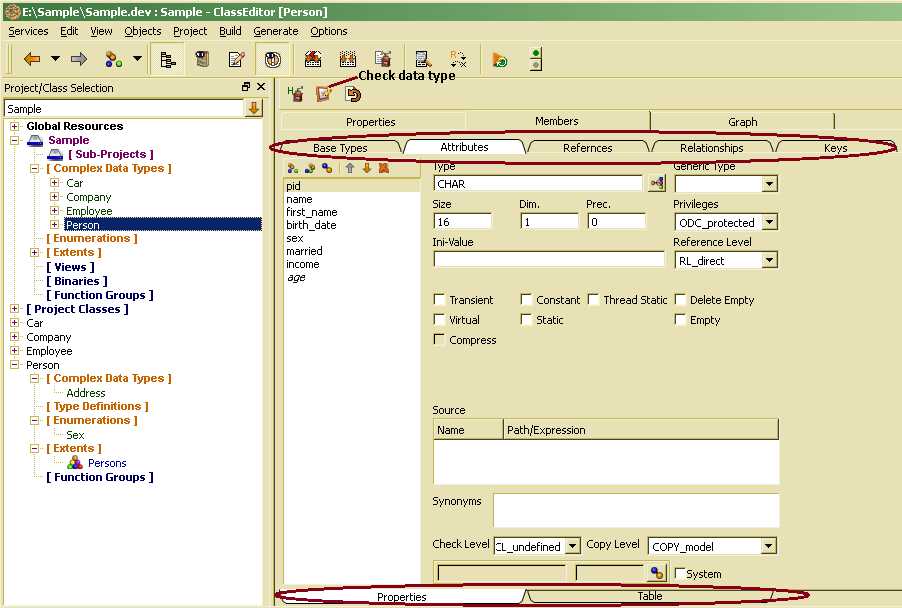
Structure details are displayed in the right side property window. After selecting a structure in the tree, general structure properties are displayed in the property window on the right side. In order to view structure properties, you click the Members tab on top. Structure properties are grouped by type which can be selected by tabs marked on top in the picture above. On bottom, there one might change between detail and list view. The list view also provides a complete member list with all structure properties.
The class view (tree bottom), allows viewing/updating class extensions of the structure definition as extents, local structures, enumerations etc.
After updating structure definitions, the checked and ready state for the definition will be reset. In order to check the structure definition one may click the check button in the structure window tool bar. In order to prepare the project for production, you have to call Database/DB Version/Production Phase from the application menu.
Defining the data model means defining object types (Complex data types), classifications (Enumerations) and collections (Extents), In contrast to relational databases, where the table definition is a structure and a collection definition, the terminology database provides different definitions for data types and collections. Thus, several collections might be defined for the same data type.
One may always use wizards for defining data model elements, which are available for different purposes. Details for data model definitions are described in ClassEditor documentation (Defining an ODABA object model). Here, just a short overview will be provided that illustrates how to define and update complex data types and enumerations.
In order to benefit most from default settings provided by the class editor, the following steps are suggested:
- Creating application relevant data types
- Defining attributes and keys for complex data types and enumerators for enumerations.
- Define extents for complex data types that need to store data with a global entry point (addresses, which might be a property of persons, only, do not require an extent).
- Define references (parts) and relationships for the complex data types.
Defining the data model this way, one will benefit when defining the relationships and references, since the system has got already sufficient information initializing references and relationships properly from type definitions. When not following this steps, this will not be a problem, since one may enter required information later on. Any kind of error will be reported when checking the data model.
After initializing a new project, one gets an empty database with the project created shown in the left side tree. After expanding the project and selecting Complex Data Types, one may start defining object types. In order to define enumerations and extents, one selects Enumerations or Extents in the tree.